05
January,
2022
4 MINUTE READ

The 5S system is a lean manufacturing tool that improves workplace efficiency and eliminates waste. There are five steps in the system, each starting with the letter S:
1. Sort |
2. Set In Order |
3. Shine |
4. Standardize |
5. Sustain |
By providing a systematic framework for organization and cleanliness, 5S helps facilities avoid lost productivity from delayed work or unplanned downtime.
The Steps of 5S
5S was created in Japan, and the original ?S? terms were in Japanese, so English translations for each of the five steps may vary. The basic ideas and the connections between them are easy to understand, though.
| Step Name | Japanese term | Explanation |
|---|---|---|
| 1. Sort | Seiri (tidiness) | Remove unnecessary items from each area |
| 2. Set In Order | Seiton (orderliness) | Organize and identify storage for efficient use |
| 3. Shine | Seiso (cleanliness) | Clean and inspect each area regularly |
| 4. Standardize | Seiketsu (standardization) | Incorporate 5S into standard operating procedures |
| 5. Sustain | Shitsuke (discipline) | Assign responsibility, track progress, and continue the cycle |
These steps feed into each other, so the sequence is important.
Clearing out unnecessary materials in step 1 (Sort) will provide the space needed to organize the important items in step 2 (Set In Order).
Then, once the work space is de-cluttered and organized, dirt and grime can be removed in step 3 (Shine).
These changes to workers? job duties and work environment should be reflected in updated procedures through step 4 (Standardize).
Finally, those new procedures won?t amount to much unless responsibility is assigned and progress is tracked ? as required for step 5 (Sustain). And with responsibility and tracking, workers will continue to apply the steps, returning to step 1.

Step 1: Sort
The first step in the 5S process is Sort, or ?seiri,? which translates to ?tidiness.? The goal of the Sort step is to eliminate clutter and clear up space by removing things that don?t belong in the area.
Clearing the Work Area
For this step, take a close look at the items, tools, and materials in a work area. Items that are necessary or useful for the work being done in that space should be kept there. Everything else should be removed.
Some of those removed items will need to be thrown away or recycled. Other items might belong to another work process or location; they should be returned to their ?homes.? However, you might find some items that you aren?t sure about.
Red-Tagging Unknown Items
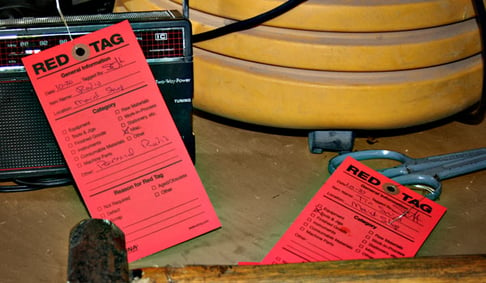


If you find an item that you can?t identify, or that has uncertain ownership, it?s time to use a red tag. ?Red-Tagging? temporarily attaches a highly-visible tag to the item, which notes where it was found and when. Then, red-tagged items from all work areas are collected in a single location: a ?lost and found? for tools, materials, and equipment.
If a work area is missing an important tool, check the red tag collection area to see if it was found somewhere else. Supervisors for each work space should check the red tag collection area periodically, in case something has been missed. Anything that belongs in a work space should be taken back there.
Reassigning Tagged Items
Items may wait in the red tag collection area for a long time. In that case, the original work area (where that item came from) doesn?t seem to need it anymore. It may be useful elsewhere, though.
In one common approach, items may be left in the red tag collection space for thirty days. After that, any supervisor may claim the item for their own work area. If nobody wants it after another week, the item can be removed from the facility entirely. Sell it, recycle it, or throw it away.
If an item will definitely be needed by the company, but isn?t needed right now, it might be best to store it for later. Before putting anything into storage, be sure it will actually be needed again. Have a specific plan for getting that item out of storage again, at a specific time. Don?t store things ?just in case? without good cause, and keep track of what?s been stored.

Step 2: Set In Order
The second step, Set In Order, was originally called ?seiton,? which translates to ?orderliness.? A variety of names have been used in English: ?Systematic Organization,? ?Straightening Out,? and ?Simplify,? for example. No matter what it?s called, the goal of this step is to organize the work area. Each item should be easy to find, use, and return: a place for everything, and everything in its place.
Building a 5S Map

Tools that are used frequently should be stored near the place they are used. Spare equipment, supplies, and other tools that are used less often can be kept in a central location, where multiple teams can share them. Items that are typically used together (such as drills and drill bits) should be stored near each other. Each of these decisions will make sense on its own, but it may become difficult to keep track of everything. It may be helpful to create a 5S map as part of this process.
A 5S map is a diagram or floor plan that provides an overview of a work area, process, or station. It provides a visual reference to show where the tools, supplies, workers, and travel paths are, and how they relate to each other. A good map may also include a description of the work that happens in the area shown.
Depending on your facility?s needs, you may find one approach easier than another:
- Draw up a map, and then implement it
- Physically arrange the workplace first, and then map it out
- Map as you go, testing ideas and writing down what works well
No matter which approach is used to create it, the resulting 5S map should be kept as a training tool, used for reference in later steps of 5S, and updated over time as the work area changes.
Communicating the Plan
Once storage locations are assigned, each storage area should be labeled. Label the outside of cabinet doors to help workers quickly identify what?s inside each one. Then, label any interior shelves to show where different supplies belong. The same ideas extend to rack labels, bins, and other storage systems.
Many facilities use a ?shadow board? for tool storage, to ensure that each tool is easy to put back in its correct storage place. With this approach, a label matching the shape and size of the tool is placed where that tool belongs. Workers can immediately spot where each item belongs, and know at a glance if the item is there or not. No more time wasted looking through drawers and bins.
Organization can extend to the floor, too. Work areas, movement lanes, and storage for supplies and finished products can all be marked with floor marking tape.


