29
July,
2021
2 MINUTE READ

Overview
DuraSuite Labeling Software provides you with an automatic pipe marker design feature. You can also customize your pipe marker and add new pipe contents information as needed.
Creating an Ammonia Pipe Marker
The Ammonia Pipe Marking module consists of three tabs: the Base Label tab, the Physical State/Pressure Templates tab, and the Arrow Wrap tab.
AMMONIA PIPE MARKER DESIGN
 To begin creating a pipe marker, click on the Pipe Markers image on DuraSuite?s opening splash menu.
A new screen appears with two icons: one for pipe marking and one for ammonia pipe marking. Click on the Ammonia Pipe Marking icon. An ammonia pipe marker template appears.
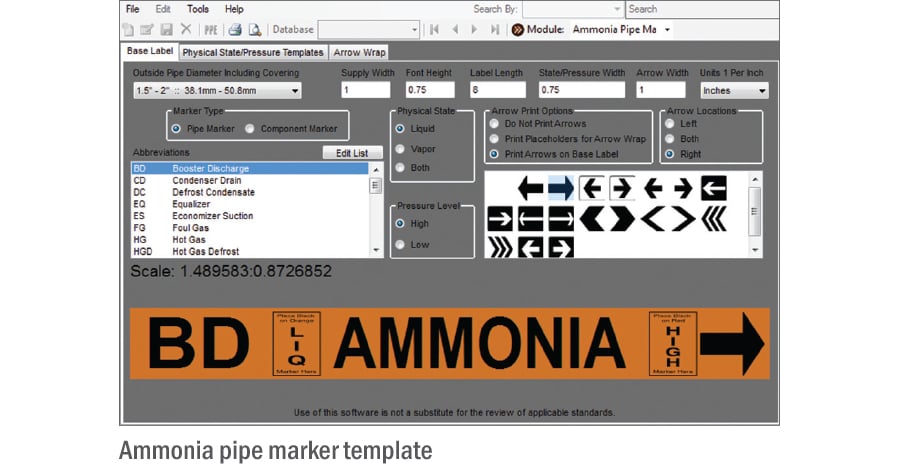
BASE LABEL TAB
The Base Label tab lets you input size and layout criteria for your ammonia pipe marker.
Placeholders can be added as guides for adhering labels to pipe markers. A placeholder for an arrow wrap may also be added on the base label.

- Set Pipe Diameter: To build an ammonia pipe marker, first insert the diameter of your pipe, including covering. Choose from the list of preset configurations or enter your own values. All values must be greater than zero for your ammonia pipe marker to preview properly.
- Choose Marker Type: Choose between Pipe Marker and Component Marker. If Pipe Marker is selected, choose the appropriate abbreviation from the Abbreviations list provided. If Component Marker is selected, choose the appropriate component from the Components list provided. Edit or add to the Abbreviations or Components list by clicking Edit List.
- Physical State: Choose from Liquid, Vapor, or Both placeholders by clicking the button next to your choice.
- Pressure Level: Choose between the High or Low placeholder by clicking the button next to your choice.
- Arrow Print Options: Choose from Do Not Print Arrows, Print Placeholders for Arrow Wrap, or Print Arrows on Base Label by clicking the button next to your choice.
- Arrow Locations: Place arrows on the left side, right side or both sides of the ammonia pipe marker by clicking the button next to your choice.
- Arrow Style/Arrow Wrap Placement Direction: Choose from the list of arrow styles. If you are printing placeholders for arrow wraps, choose the desired direction of the arrow wraps.
Print the marker before proceeding to the next tab.
To print your ammonia pipe marker, please refer to the knowledge base article on this topic.
PHYSICAL STATE/PRESSURE TEMPLATES TAB
Select the Physical State/Pressure Templates tab. The physical state and pressure level labels indicate the color stock needed to ensure IIAR compliance, as well as the total size of each label. Click the corresponding physical state or pressure level template, then print.

NOTE: Ensure your DuraLabel printer is loaded with corresponding supply to print each part of the ammonia pipe marker.
More Support Options
If you have any questions about using DuraSuite label design software, get help from DuraLabel? world-class support team by calling 800-788-5572 or visiting DuraLabel.com. We?re here to help with all your labeling needs!


