Unboxing DuraLabel Toro Max | Industrial Label Printer First Look
Video Transcription
Hey there, this is Alex over at DuraLabel and in this video we're going to be unboxing our DuraLabel Toro Max Industrial Label Printer.
To begin, we're just going to cut it open using a box knife in the top. With our box fully open, you'll see our Quick Start Guide which will give you a list of what is included in the box. We'll get that out of the way as well as the accessories. Now, we'll go ahead and get the printer out of the box as well as the packet. And then we'll get the box out of the way here. With the printer well protected by the foam, please make sure to keep the foam as well as the box that came in. That way, if you do need to ship this back for any reason, it can protect it against any unexpected shipping issues.
Once we have the Toro Max out, we'll just go ahead and remove the foam from both sides. And we'll take it out of its bag.
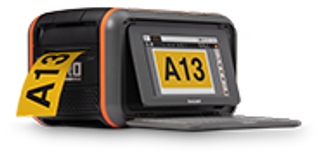
Here's your Toro Max. The Toro Max uses thermal transfer printing to create long-lasting and durable labels that won't fade over time. The heat creates a permanent print on your sign that can last up to 10 years and resist damage from chemicals, water, and UV light.
Next we're going to get our accessories out of their top loader, so I'll grab that as well as the mouse that comes with it. Go ahead and start get some of this out of our way. With all the accessories for the Toro Max out of its bag, I'll quickly go over everything that comes with your Toro Max printer. First you'll have your quick start manual that will also feature the instructions on the back, the power adapter that'll plug into the printer as well as the power cord for the wall. You'll get a supply spindle for loading your premium vinyl on as well as supply wings to stabilize it. A stylus if you'd like to use that. A scraper for removing old labels as well as installing the new ones. Two swabs for cleaning the cutter during use and operation. A flash drive that will include the PC drivers as well as the software for use on the PC, and then lastly a mouse with the dongle included on the back of the Toro Max printer.
Now that we have everything unpackaged and out of its bubble wrap, I'm going to give you guys a quick tour of the Toro Max system before we power it on and do our first print. The first thing you're going to want to pay attention to is the latch on the top. This is going to release the keyboard itself as well as this button that will release the screen. That way you can have it at any angle you need for viewing. You're also going to notice there's a power button in the very center and a feed button just to the left of that. We'll get this closed back up and I'll show you the front and how to open the lid. On the front of the Toro Max, you'll notice that we have the latch — lift that up to release the lid. You'll have your supply well where you'll put the spindle and supply when you do load those as well as the rails you'll slide the ribbon into.
With our quick tour of your Toro Max printer complete, we're going to go ahead and power it up and get ready for your first print. Before we get it powered up, do be mindful there is a "this side up" sticker on the power port itself so make sure that's facing up as you plug it in with the back of the printer.
To begin loading the printer, I'm going to face this to you so you can see a little better. I'm going to lift this lid back up as well as remove the QA prints that may still be in the printer. I'm going to start with loading the premium yellow vinyl itself so I'll open that up. Pay attention to the durable sticker on one side of the roll itself and load the supply spindle and press it in the supply well. With the supply now loaded in the supply well, I'm going to lower the cutter so that you can see more into the machine. We're going to move the vinyl about to the center of the platen roller and get it centered within these media guides. With the supply fully loaded, I put that cutter back up and we're going to go ahead and load in our premium black ribbon. We'll get that opened. Make sure that you do have the sticker with the smart tag facing into the printer as you do load it, slide in like so and close your lid.
Now we're ready to print. Now that we have our Toro Max plugged in and loaded, we're going to go ahead and get it turned on. So first I'm going to release the keyboard again, we'll go ahead and remove this plastic from the screen and I'll power it on.
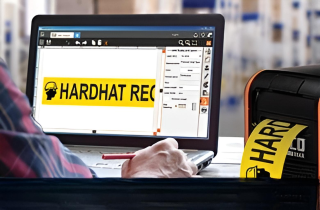
The Toro Max printer is powered by LabelForge PRO, DuraLabel's free sign and label design software. When you first power on your Toro Max system, you'll be presented with our setup instructions. These are going to include setting the system language, the keyboard layout, and testing your keyboard to make sure the keys are properly working. Go ahead and type something out and once you've done that, hit next in the bottom right. This is where you will set up your wireless connection. Connecting to Wi-Fi will help you stay updated with new features and print from your network while on the go. Press next at the bottom right to continue setup. Otherwise you can hit skip on the top right. Lastly you'll be presented with an update screen — make sure your system's up to date, and when that's done, click finish.
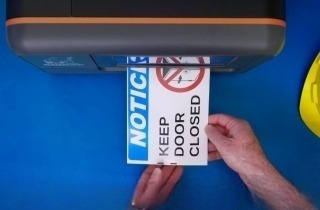
Now that we're at our LabelForge PRO home screen, we're going to be utilizing our premade signs library to look for our first print. For our example we're going to be printing out a forklift sign. From here I'm just going to use our search feature and type in forklift. Now I'm going to select the forklift sign that I want to print — I'll use this "Look Out for Forklift" sign — and then click on open. With our label already designed for us, I'll just simply tap on the printer icon in the bottom right and click on print.
There you go. We've printed our first label, guaranteed to last 5 years in harsh conditions and 10 years in areas of normal use.
Thank you for watching. If you have more questions about the Toro Max, please refer to the user guide, visit our Product Knowledge Base, or contact a Specialist at DuraLabel.com.