As your workplace gets more and more wires and cables, it becomes more and more important to know which cord leads where. A network cable plugged in at the wrong port can cost a lot of troubleshooting time; a disconnected grounding wire can cause a deadly fire.
Wire Marking Systems
The best way to prevent switched cables and related accidents is to mark each cable individually. In a good marking system, each cable can be identified at a glance; you should be able to tell immediately what type of connection that cable is for, and where it leads. One of the best ways to reach this goal is to combine color coding and written details.
Color Coding for Wire Marking
Wire color coding systems offer immediate recognition, but several different standards apply to similar wiring in different situations. The color code that you know may not match the one in use in a different facility - or even on a different piece of equipment. If your wire marking system uses color codes, you should keep a description of the system posted near the wires that are affected.
Written Details for Wire Marking
Add written details for more specificity; a cable might be marked with a description of its origin and destination, or it might show a reference number or a code that can be looked up in a wiring schematic. This level of detail is critical with multiple similar wires, where color coding alone wouldn't be helpful. Written information is only helpful if you can read it; if the marking is scratched off, worn away, or too small and inaccessible, it may as well not be there at all.
Types of Wire Markings
To combine the two methods, use color coding to identify the type of cable or connection, and use written details to identify exactly which connection the cable serves, or where it leads. You can mark cables and wires with flag labels, wire wraps, or shrink tubes.
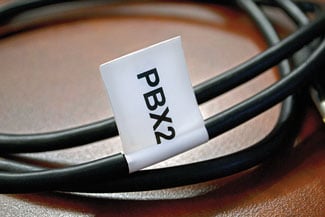 Flag Labels
Flag labels are so called because they fold around the wire, with the ends of the label stuck together to make a "flag" that stands out. This provides an adequate area for written information, which is helpful for very small wires. The eye-catching flag can make one important wire stand out among dozens of others. However, flag labels can get caught on other wires or enclosures, and they can be torn, worn, or lost easily.
 Wire Wraps
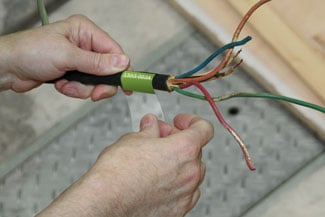
Wire wraps are a better approach for permanent cable marking. Instead of folding over the wire just once, the transparent "tail" of a wire wrap goes around the wire completely, and then overlaps on top of the printed material. By covering those printed details, the transparent part of the label acts as a protective shield, keeping it from being worn away; by sticking to itself, and even winding around again, a wire wrap can become the most securely-fastened label type for cables. Sometimes, a wire wrap will even outlast the wire it's attached to!
 Shrink Tubes for Wire Marking
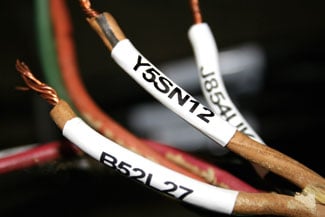
Shrink tubes are composed of a special polyolefin material that shrinks when heated, you can create a complete tube-shaped label, slip it over the end of a cable, and tighten the label down with a heat gun. Shrink tubes are more flexible than wire wraps, and leave no residue behind if you need to remove them for later re-labeling. They look very clean and professional, and are perfect for cables that will be visible in a finished system. The down side of a shrink tube is that you need access to the end of a cable in order to mark it this way; a wire wrap can be applied in the middle of a long wire without disconnecting either end, but a shrink tube cannot.
Size of Text for Wire Marking
The next question is how large to make your printed information. That text needs to be large enough to be read easily, but small enough to be entirely visible from one side of the cable - if half the letter is on the other side of the cable, it won't be easy to read! The height of those letters should be based on the diameter of your cable. As a rule of thumb, don't make the letters taller than the diameter of the cable, and don't make them smaller than half that size. Bigger text, within that range, is easier to read, and capital letters are clearer than lowercase.
For instance, if you are marking a 16 gauge (AWG) wire, the diameter of the wire will be about 0.05 inches; the text on your label could range from 0.05 inches high to 0.025 inches, and should be in all capital letters. Most documents that you print from a computer will have text at least twice that size; anything that will fit on 16 gauge wire will have to be very fine print!
If you are using Shrink Tube, remember that your text will shrink along with the tube; most shrink tubes will reach from one-half to one-third of their original size when in use. Continuing to use that rule of thumb, if you will be labeling a 0.25-inch cable with shrink tube, your initial text should have letters around 0.5 inches tall.
Since most design programs on computers, use "points" to measure text size, it may be helpful to remember another shortcut. As a rough estimate, you can multiply the intended height (in inches) of your capital letters by 100 to get the size for that text (in points). Capital letters that are 0.12 inches tall will be about 12-point, in most typefaces.
Related Resources

Cables Markers Tags
You may be wondering which type of labels you should use for identifying cables and wires. First you need to ...
Read
Wire Color Coding
There are many wire identification standards, and many of them rely on color codes. Not all electrical wiring ...
Read
Cable Labeling
Although cable labeling is not required by legal codes, the American National Standards Institute (ANSI) and ...
Read.png)

