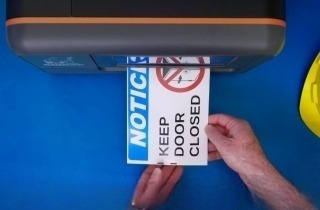
How-To Load Supplies in Your DuraLabel Bronco Industrial Label Printer
Video Transcription
In this video you'll see how to load supplies your DuraLabel Bronco Bronco uses two separate supplies for printing; The printing ribbon (ink) and the label stock (vinyl). The combination of supplies that are loaded will determine the colors of your printed labels. Start by raising Bronco's lid, lifting at the front edge above the cutter opening. Push the two turquoise tabs at the front of the print head carriage to let it raise.
We'll start with a takeup core. Place one end of your empty takeup core on turquoise spring loaded holder near the right side of the top of the print head carriage. Turn the takeup core until the tab on the holder locks into the notch in the core. Next we'll load the fresh roll of ribbon.
Hold the new roll of ribbon so the loose end falls from the back. Turn the ribbon core until the tab locks into the notch in the core. Pull the loose end of the ribbon forward past the printhead and then up and around the printhead carriage to the takeup core. Use a small piece of label stock, or tape, to adhere the end of the ribbon to the top of the takeup core.
Finally, turn the takeup core's turquoise holder by hand to takeup and slack in the ribbon and roll past any areas where your finger prints are showing. Start by inserting your Bronco's supply spindle into your roll of label stock. Then lower the label stock into it's space in the back of the printer, so that the supply spindle rests in the two slots. Fresh supply should unroll from the top of the roll shiny side out, feeding toward the front of the printer.
Then, feed your label stock under the turquoise adjustable supply guides and just past the grey rubber roller. Finally, lower the printhead carriage pressing firmly on both textured areas until it latches into place. Close the lid of the printer. You're loaded, and ready to go!

.webp)