27
June,
2023
3 MINUTE READ

Overview
DuraSuite Labeling Software provides you with an automatic pipe marker design feature. You can also customize your pipe marker and add new pipe contents information as needed.
To create an ammonia pipe marker, please refer to the knowledge base article on this topic.
Creating a Pipe Marker
The fastest and easiest way to create a pipe marker is by using DuraSuite's automated features. New color displays correspond to the category of pipe marker you're creating to help ensure you load the correct color of vinyl.
Please note that only information on the Pipe Marker tab is addressed in this section. For arrow wrap information, see the section on "Arrow Wrap Tab."
AUTOMATIC PIPE MARKER DESIGN
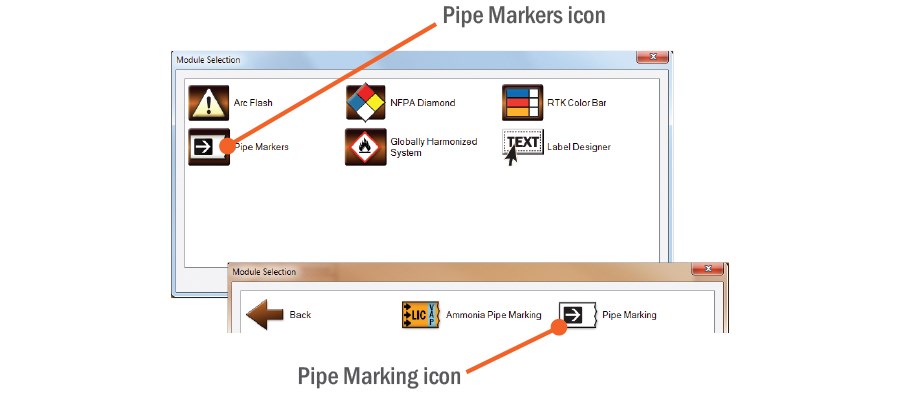
To begin creating a pipe marker, click on the Pipe Markers image shown on DuraSuite's opening splash menu.
A new screen appears with two icons, one for pipe marking and one for ammonia pipe marking. Click on the Pipe Marking icon.
A pipe marker template appears with the Pipe Marker tab chosen.
ADDING CONTENT
Select your pipe's contents from one of the four color-coded category menus at the top of the screen. Your selection appears in the Text field and display area.

NOTE: Each drop-down menu is color-coded to identify a content category. Use the same vinyl and ribbon color as the colors shown on the pipe content menu.
If your pipe's contents are not listed in one of the drop-down menus, enter your pipe's contents in the Text field.
Now select an arrow style from the template to indicate the flow direction. Determine whether you want the arrow to appear on the left side, right side or both sides of the pipe contents, then click the circle next to the chosen option.
Next, select the pipe's outside diameter from the "Outside Pipe Diameter Including Covering" drop?down menu. The outside diameter setting automatically sets the pipe's "Supply Width," "Font Height," and "Label Length" (as specified by ANSI code).
Labels can be printed in either landscape or portrait format. Use the Stock Orientation buttons to select the orientation you want for your pipe label.
NOTE: "Text To Label" Automatic Resizing is not supported by the Portrait format.
NOTE: A pipe marking label can be saved as a .pmlx file and loaded by either double-clicking the file or using the File > Open menu.
CUSTOM SIZING
DuraSuite Labeling Software lets you customize the size of your label's text.
Click None in the "Automatically Resize" box, then change the dimensions in the "Supply Width," "Font Height" and "Label Length" fields to the sizes you want.
If the settings you chose do not create an acceptable label appearance, click the Reset button to automatically set text and label size.
Printing Pipe Markers
NOTE: Label colors are shown as reminders of the correct ribbon and supply color to load. The print preview will always be monochrome.
You can print two styles of pipe markers using DuraSuite Labeling Software.
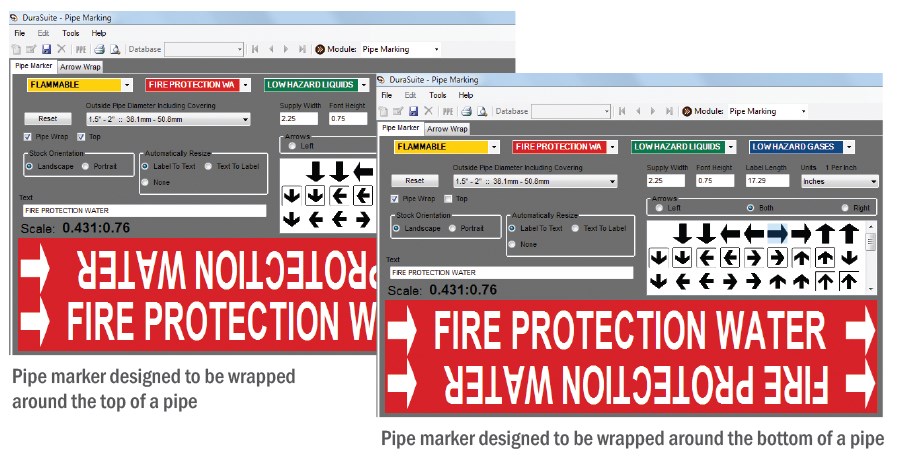
Pipe markers designed to be wrapped around the pipe provide information on both sides of the pipe. To print this type of pipe marker, click the box next to "Pipe Wrap" to place a checkmark in the box. This displays a second checkbox labeled "Top."
- If you click the Top box, a label designed to be wrapped over the top of the pipe will be printed.
- If you leave the Top box unchecked, a label designed to be wrapped around the bottom of the pipe will be printed.
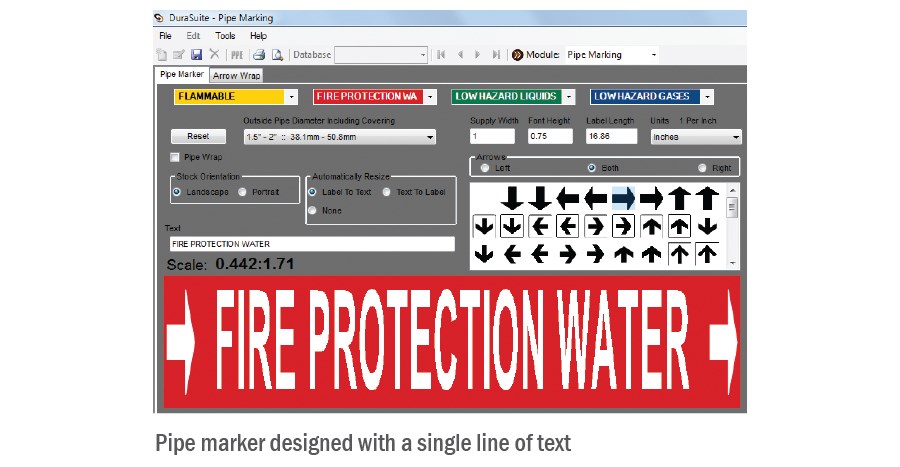
Pipe markers with a single line of text are the more commonly used type of pipe marker. They allow placement of a label on one side of a pipe. If two sides of a pipe need to be marked, two pipe markers are used, one on each side.
PRINTING PIPE MARKER SIGNS
You may also choose to print your Pipe Marker as a segmented sign. Select File > Print Special > Print Sign from DuraSuite's main menu. A Print Sign dialog box appears. Select your DuraLabel printer and supply width, then click Properties.
A Properties dialog box appears. Click on the Stock tab and select After Job from the Occurrence drop-down menu, then click OK. Your DuraLabel printer will print a page-per-letter pipe marker, cutting at the end of the label.

NOTE: The Pipe Wrap option is not supported by the Print Sign feature.
Arrow Wrap Tab
DuraSuite lets you create custom arrow wraps for use with pipe marking. Click on the Arrow Wrap tab to get started. The Arrow Wrap screen appears, displaying a preview window with colored arrow wrap to let you know the correct supply color to load.
![]()
- Choose pipe diameter (including covering) from the drop-down menu.
- Change measurement unit as desired using Units drop-down menu.
- Populate the information fields*.
- Choose an arrow style.
*Information Fields Cheat Sheet
- Wrap Width?arrow wrap supply width
- Wrap Length?arrow wrap length, typically the pipe's outer diameter including covering
- Arrow Count?number of arrows to be placed within arrow wrap's length (number of arrows determines arrows' thickness)
- Arrow Spacing?amount of space between arrows (affects arrows' thickness)
- Arrow Width?arrows' width (affects wrap margins)
To print your arrow wrap, please refer to the knowledge base article on this topic.
More Support Options
If you have any questions about using DuraSuite label design software, get help from Duralabel' world-class support team by calling 800-788-5572 or visiting Duralabel.com. We're here to help with all your labeling needs!


