- Home
- >
- Resources
- >
- Knowledge base
- >
- Sequencing Labels for DuraLabel 4000
Resource Navigation
Sequencing Labels for DuraLabel 4000
17
January,
2024
4 MINUTE READ

Overview
Learn how to merge information and create sequenced labels using Microsoft? Word and Excel. Variations may occur among different versions of Word, but basic principles are the same. The DuraLabel 4000 is designed to work with any currently supported Windows software and should work with the software installed on your computer. Microsoft Word 2003 and 2010 were used to describe many procedures below.
The following information assumes your printer has been properly installed and is connected in the online mode.
Like visuals? You can view a step-by-step tutorial of the following steps here: DuraLabel 4000 User Guide
Sequencing
How to do Number Sequencing using Word and Excel.
Sequencing is commonly used to increment a numeric value to be used in labels for wire wrapping. You can use of an Excel spreadsheet template as well as a Word template (included on your installation CD):
- Open an existing template from the DuraLabel CD or start a new Word document.
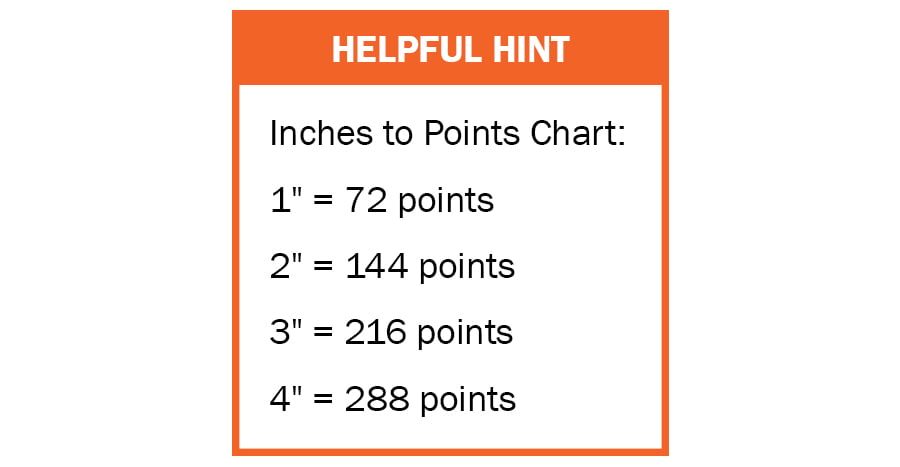
- Because Excel uses pixel measurement instead of inches, you will want to set this to match in Word. Go to Tools >>> Options to bring up the property sheet for Word. Click on the General tab and locate the option to change the unit of measure. Change it to Points as this is the same as pixel.
- Next go to File >>> Page Setup and click on the Paper If you started from a supplied template, make note of the width and height of the page as you will need to use these values to set the cell size in the Excel template. If you're starting from scratch, set the width and height to the desired size of the label.
Now that you have the desired label size, it?s time to add the text to it. Keeping Word open, browse to the provided Excel template Number Sequence.xls. This is a predefined template with the formula already in place to increment a numeric value by one.
- Open the existing Excel template Number Sequence.xls.
- First, format the cells to match the size of label you have. Click on the upper left corner of the spreadsheet to highlight the entire document.
- Next, left-click and hold the column line between A and B. You can see a small box pops up giving you the pixel size of the width. You will want to set that value to the same width as your label. Do the same for the row height.
- Now that you have the correct size matching your label, change the value in the first cell (column A, row 1) and enter any static text you want. Leave it blank for none. In the next cell (column B, row 1) enter the number you would like to increment. In the next cell (column C, row 1), enter the value you would like to increment by Default is 1.

After setting this, you should see the increment in each cell below cell 1. In this example, the cells have been adjusted in increments of 10. However, to increment further, simply left-click on cell 10 to highlight it, then left-click and hold on the small point in the lower right corner of the cell and drag down over how many cells you want to increment.
Example: to increment the value 100 times, drag the cells down to the 100th row.
Once you?re satisfied with the number of increments and cell span, it?s time to copy this into your Word template. Go back to the Word document that you previously created. !!Remember!! The page layout of the Word template must match the cell size you specified in your Excel template.
Select the entire Column you just created by clicking on the top header of the cell. In this case, the ?A?. Go to Edit >>> Copy, to copy the entire column. Now switch over to your Word document, click anywhere inside your predefined page and go to Edit >>> Paste.
If the cells don?t paste into the exact measurements of your label, adjust the margins so that they encompass the entire label.
You should be ready to print.
Import from Excel
Learn how to transfer Excel spreadsheet information into a Word label. The following instructions are for users of Windows 2000.
Merging One Column from a Spreadsheet to a Label
- Make sure the Excel file you are going to merge has been saved.
- Open up the Word Document with the label template.
- Alter the font in Word to the size of your choosing.
- Open up the Excel file you intend to merge into the Word label.
- Click on column header A, right-click the mouse and select Copy.
- Toggle Alt-Tab over to the Word document and find the Edit button on the Windows Tool Bar (top left of screen) and then click and select Paste Special.
- Next, select Unformatted Text and click OK.
- The Excel column should now be in the Word label. You are now ready to print your labels.
Merging One Column from a Spreadsheet to a Label
- Open the saved Excel document you plan to merge into Word.
- Open your blank label template within Word.
- On the toolbar on top of Word, click on Insert, then click Text box.
- Use the crosshair cursor. Click in the field of the document, a text box will appear.
- Resize the text box to your preference.
- When the text cursor is blinking in the text box, click on the Insert menu and select Field.
- The box on the left should remain with the blue highlighting of the word ?All?.
- On the right column, move the cursor so the blue highlight is over MergeField.
- In the long horizontal box below, ?MERGEFIELD? will appear.
- Put a space after ?MERGEFIELD? then type in the column heading from your Excel document that you will want to merge into the label (e.g.., ?Input?).
- It will then look like this: ?MERGEFIELD Input?.
- Click OK and the box will vanish.
- At this point, you should have the word ?Input? (for example) in your text box.
- Create an additional text box(es) within the label and repeat steps 3 ? 12 for each additional cell you plan to transfer from the Excel document into the Microsoft Word label.
- Close the Excel document.
- On the word toolbar, click on Tools then Merge documents.
- At the bottom, click the Files of Type drop-down menu.
- Click on the All Files item, then find the file name of the Excel document you plan to merge into Word. NOTE: Make sure you are looking in your My Documents folder.
- Double-click on the correct Excel document.
- On the next box you see, ?ENTIRE WORKBOOK? will be blue highlighted. Click OK.
- You will then see a pop up box with a question mark. Click OK.
- On your Word document, click on Tools, then Mail merge.
- Click on Create, then Form Letters, then click Active Window.
- Click on Get Data, then click on Open Data Source.
- At the bottom, you will see Files of Type.
- Click on the drop-down menu of All Files at the bottom.
- Find and double-click on the file name of your Excel document.
- Click OK.
- Click Merge.
- Click Merge and the document will merge from Excel to Word. You are now finished.
Help is also available under the Word Toolbar. Click on Help and type in ?Merge from Excel to Word?, then click on Search. Then click the option Use mail merge....
More Support Options
If you have any questions about using your DuraLabel 4000 printer, get help from Graphic Products? world-class support team by calling 800-788-5572 or visiting GraphicProducts.com. We?re here to help with all your labeling needs!
RELATED RESOURCES
Sequencing Labels LabelForge
Overview With LabelForge, you can automatically generate a batch of labels that use sequential numbers. ...
Watch NowSequencing Labels for DuraLabel PRO
Overview Learn how to merge information and create sequenced labels using Microsoft? Word and Excel. ...
Watch NowSequencing Labels for DuraLabel 9000 | DuraLabel
Overview Learn how to merge information and create sequenced labels using Microsoft? Word and Excel. ...
Watch Now.png)


