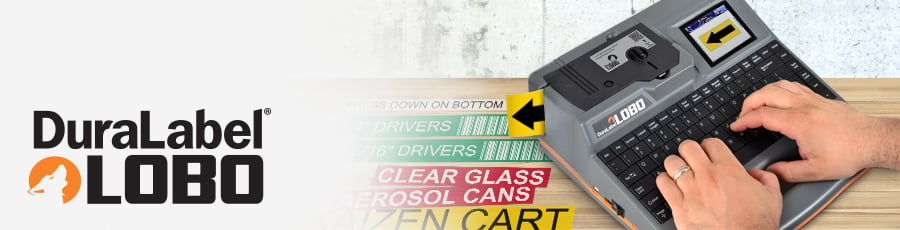
17
January,
2024
6 MINUTE READ
Overview
When you first turn the Lobo on, the screen displays the label canvas. The label canvas displays the text and other content placed on the label. This tutorial will teach you label-making basics.
Like visuals? You can view examples here: DuraLabel Lobo User Guide
Label-Making Basics
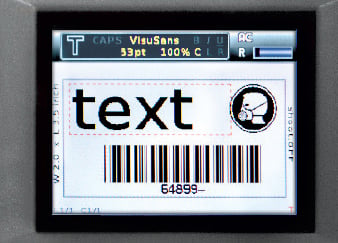
When you first turn the Lobo on, the screen displays the label canvas. The label canvas displays the text and other content placed on the label.
CONTENT TYPES
There are five types of content that can be placed on the label canvas:
Text: This includes any keyboard-entered characters, like letters, numbers, and punctuation.
Symbol: The Lobo has a pre-loaded library of symbols and pictograms that are commonly used for hazard or information labels.
Barcode: A barcode is a machine-readable graphical element that stores data. Lobo offers several barcode types.
Sequence: A sequence field increases or decreases automatically after each label is printed. For example, a series of labels could read ?501,? ?502,? ?503,? and so on. There are several format settings for sequences.
Time/Date: Time and Date fields automatically fill with the current date and/or time when the label is printed.
Text is the default content type; you can start to enter text onto a new label immediately, just by typing on the keyboard. The other content types are accessed by pressing their respective function keys.
FIELDS
The cursor is the blinking vertical line visible on the label canvas. New text and content are placed at the cursors location.
A field is the term used for a unit of content on the label canvas. The field where the cursor is currently located has a dotted-line rectangular border around it. A new field is created when a new row of content is created, or when a new content type is created.
The up and down arrow keys on the keyboard move the cursor between fields. Pressing the down arrow key moves to the next field; pressing the up arrow key moves to the previous field.
The right and left arrow keys allow forward and backward movement inside a text field.
The End key moves the cursor to the end of a field. Shift + End moves the cursor to the start of a field.
The Backspace key deletes text or content to the left of the cursor. Shift + Backspace deletes text or content to the right of the cursor.
CELLS
The Lobo has various layouts that are selected by pressing the Layout key. Layouts have sections known as cells arranged in various configurations. If no layout is chosen, the label has a single cell.
The label canvas only displays one cell at a time. To move between cells, use the Next Cell key to move to the next cell. Pressing Next Cell multiple times will eventually cycle through all the cells, returning to the first cell. You can also use Shift + Next Cell to move back to a previous cell.
MULTIPLE-LABEL PROJECTS
There can be more than one label in a single label project. The Next Label key moves to the next label in a project, creating a new label if one does not already exist. Pressing Shift + Next Label moves to the previous label. A maximum of eight labels can be stored in a multi-label project.
FUNCTION KEYS
Label content is formatted using the keyboards function keys. Many of the function keys bring up control screens where settings can be edited. The arrow keys and the Enter key are used to navigate these menus and make selections.
Label-Making Lessons
The following three lessons will walk you through creating three labels. Each one is more complex than the one before, so you should do the lessons in order. After completing the lessons, you will understand the basic functions of the Lobo.
Before starting the lessons, load a cartridge into your Lobo and power it on.
TIPS: You can press the Esc key to cancel any changes and return to the previous screen. If you make mistakes and want to start over, press the File key at the top left of your keyboard, select New from the menu, and press Enter. You will be asked whether you want to save the work you've done; select No. A new, blank label will be created.
LESSON 1: SIMPLE LABEL WITH TEXT AND SYMBOL
This lesson will teach you how to make a simple label that contains text and a symbol.
Step 1: Enter text.
The Lobo starts in text entry mode. Use the keyboard to type the word POWER.
Step 2: Insert the symbol.
Press the Symbol key on the keyboard.
Use the up and down arrow keys to scroll through the symbol categories. Go to the second category, called Arrows, and press Enter.
Use the directional arrows to browse the symbols in that category. Select the symbol in the top row, and press Enter to insert that symbol into the label.
Step 3: Print the label.
Press the Print key, which is at the top right of the keyboard, under the Setup key.
LESSON 2: MULTI-CELL LABEL
In this lesson we will make a pipe label using a special layout, some text formatting, a Time/Date field and a frame.
Step 1: Create a new label.
Press the Next Label key to create a new blank label in the same project.
Step 2: Select a layout.
Press the Layout key.
Use the arrow keys to browse the layouts. Select the layout and press Enter.
The layout of the current label is visible in the upper right corner of the screen. The current cell being worked on is highlighted in yellow.
Step 3: Enter content in first cell.
Type Pipe #20.
Step 4: Enter content in second cell.
To move to the labels next cell, press the Next Cell key.
Type Contents.
Press Enter to move the cursor to the next line in that cell.
Type Water.
Step 5: Enter content in third cell.
Press the Next Cell key to move to the third cell.
Type Install.
Press Enter to move the cursor to the next line.
Press the Time/Date key. This will place a time field and a date field on the label. These fields are automatically populated with the current time and date, as they are set in the Lobo Setup menu.
Press the up arrow key twice to move to the time field.
Press the Backspace key to delete the time field, leaving only the date field.
Step 6: Apply text formatting to first cell.
Press Next Cell once to move back to the first cell.
Press the Font Options key to bring up the font formatting menu.
In control screen menus, like this one, the left and right arrows are used to change settings. To turn Bold to On, press the right arrow key. You will see the setting change from Off to On. Press Enter to accept the change.
Next, you will choose how the text formatting will be applied. Choose Entire Cell and press Enter.
Step 7: Apply text formatting to second cell.
Press the Next Cell key to move to the second cell. Press the up arrow to select the field that has the text Contents.
Press Font Options and turn Underline to On. Press Enter.
Choose the Selected Field option and press Enter. The Selected Field option lets you apply formatting to a single field instead of to an entire cell or an entire label.
Step 8: Add a frame.
Next, you will be adding a frame, or border. Press the Frame key to enter the frame menu.
With Frame selected, press the right arrow twice to change the setting from Off to Grid.
Press Enter to accept the changes.
Now you will have a choice of applying the frame to the entire label or all the labels in a project. Select Entire Label and press Enter.
Step 9: Preview label.
Press the View Label key.
Select Print Preview by pressing Enter.
Scroll across the label using the left and right arrow keys. If the label looks correct, it is ready to print.
Step 10: Print the label.
Press the Print key.
LESSON 3: BARCODE LABEL WITH SEQUENCE
In this lesson, you will be creating a label, intended for use on a product shelf.
The barcode number will be sequenced data, meaning that if you printed several of these labels in a series, the barcode numbers would read: 3011, 3012, 3013, etc.
Sequencing is useful for such tasks as creating barcodes for a large number of products or creating numbered labels for many pieces of equipment.
Step 1: Create a new label.
Press the Next Label key. This creates a new blank label in the same project.
Step 2: Create a barcode.
Press the Bar Code key. This will bring up the barcode menu.
Scroll down to Check Digit and turn it OFF by pressing the left arrow key. If it is already turned off, leave it off.
Move down to Sequence and turn it ON. Press Enter. Next, several screens will walk you through sequence options.
The first screen selects whether the sequence will increment (Inc) or decrement (Dec) with each successive print. Leave this set to Inc and press Enter.
The next screen selects the Input Sequence Count Value. This allows you to control the value by which each label will advance between printing. For this example, we want the numbers to increase by 1, leave the value at 1 and press Enter. (If you wanted a sequence that increased by 2, like 1, 3, 5, 7, you would put 2 for this value.)
The next screen selects the Input Sequence Start Value. This is the value that the sequence will be when the first label prints. For this value, enter 3011. Press Enter. The barcode appears on the displayed label.
Step 3: Print the barcode series.
Press the Print key. The Input Quantity field lets you choose how many labels in the sequence you want to print. Print three labels (barcode numbers 3011, 3012 and 3013) by entering 3 and pressing Enter.
Step 4: Save the label files.
Press the File key.
Move down to Save and press Enter.
Type Lesson and press Enter. This multi-label project will be saved as Lesson and can be accessed by opening the File menu and choosing Open.
More Support Options
If you have any questions about using your DuraLabel Lobo printer, get help from DuraLabels world-class support team by calling 800-788-5572 or visiting GraphicProducts.com. We're here to help with all your labeling needs!


