17
January,
2024
4 MINUTE READ
Overview
Administrator rights may be necessary to install a printer and/or print driver on your system. If you are installing Catalyst as a network printer, you will also need network settings and an ethernet cable to complete the installation process. Should you need assistance, please contact your Systems Administrator. If you no longer have your Catalyst CD, you may also download drivers from the DuraLabel Catalyst Printer Support Page. For additional resources, see the Catalyst DuraSuite Supplemental Guide.
Like visuals? You can view the instructional tutorial here: DuraLabel Catalyst User Guide
Front View
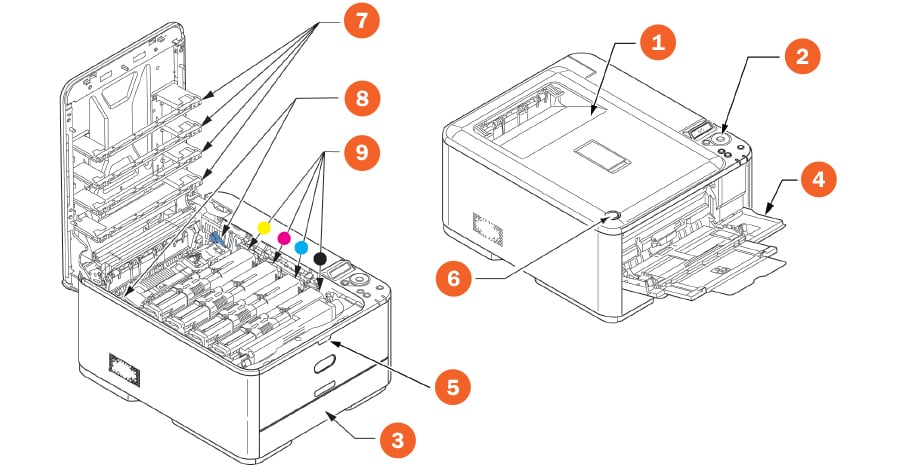
- Output stacker, face down. Standard printed copy delivery point
- Operator panel. Menu driven operator controls and LCD panel
- Paper tray. Standard paper tray. Holds up to 50 DuraLabel Catalyst Supply sheets; 250 8.5" x 11" sheets of 20 lb paper
- Multi-purpose tray. Used for feeding 6.5" x 9.5" DuraLabel Catalyst Supply sheets, heavier paper stocks, envelopes, and other special media. Also used for manual feeding of single sheets when required.
- Multi-purpose tray release recess
- Top cover release button
- LED heads
- Fuser release levers
- Toner cartridges (CMYK)
Rear View

- AC power socket
- Rear, face up stacker
- USB-B interface
- Network interface*
*The Network Interface may have a protective ?plug? which must be removed before connection can be made.
Installing Catalyst
Connect the power supply from the Catalyst to an electrical outlet and position Catalyst near an available USB port on your PC. Do not plug Catalyst into the USB port until instructed to do so.
- Windows XP: Place the included Catalyst CD into your CD drive and wait a moment for the splash screen to appear. If the splash screen does not appear, double-click My Computer and double-click the CD drive or DVD drive. An Open file ? security warning message may appear. Click Run to continue. Proceed to page 5.
- Windows 7: Place the included Catalyst CD into your CD drive and wait a moment for the splash screen to appear. If the splash screen does not appear, click the Start menu and choose Computer. Double-click the CD drive or DVD drive. Proceed to next page.
- Windows 8: Place the included Catalyst CD into your CD drive and wait a moment for the splash screen to appear. If the splash screen does not appear, from the Start screen choose Windows Explorer. In the Libraries window select Computer, then select the CD drive or DVD drive.
When the splash screen appears, select Install Driver at right. A User Account Control window may pop up, verifying that you want to allow the program to make changes. Select Yes to continue. Proceed to next page.
- Click on Install Driver, then click Next in the Driver Wizard setup window that appears.
- Click I Agree on the DuraLabel Driver License Agreement window that appears.
- Select DuraLabel Catalyst and click Next.
- Do not plug Catalyst into your PC yet. Click Next.
- Choose the install location and click Install.
- At this time, press the power button on Catalyst and plug its USB cable into your PC. Click Next.
- Click Finish to close the Driver Setup wizard and proceed by letting Windows automatically install the driver.
- Your PC will now install Catalyst. An icon with a moving green circle may appear at lower right. You may click for status or wait for it to complete.
- When device drivers have been installed, Windows will let you know that the process has completed. Click Close.
WINDOWS XP
- Click on Install Driver, then click Next in the Driver Wizard setup window that appears.
- Click I Agree on the DuraLabel Driver License Agreement window that appears.
- Select DuraLabel Catalyst and click Next.
- Do not plug Catalyst into your PC yet. Click Next.
- Choose the install location and click Install.
- At this time, press the power button on Catalyst and plug its USB cable into your PC. Click Next.
- Click Finish to close the Driver Setup wizard and proceed by using the following instructions to step through the Found New Hardware wizard.
- Found New Hardware Wizard will appear. Select No, not this time and click Next.
- Select Install the software automatically (Recommended) and click Next.
- Windows searches for driver files. A magnifying glass image will appear.
- Hardware Installation window will appear; click Continue Anyway.
- Click Finish to close the Found New Hardware wizard. Setup is now complete.
TO UNINSTALL THE CATALYST DRIVER
Place the Catalyst CD into your CD drive and when the splash screen pops up, select Uninstall Driver.
If the CD splash screen does not appear:
- Windows XP: Double-click My Computer and double-click the CD drive or DVD drive.
- Windows 7: Click the Start menu and choose Computer. Double-click the CD drive or DVD drive.
- Windows 8: From the Start screen choose Windows Explorer. In the Libraries window select Computer, then select the CD drive or DVD drive.
When the splash screen appears, select Uninstall Driver. (In Windows 8 a User Account Control window may pop up, verifying that you want to allow the program to make changes. Select Yes to continue.)
You may also access the uninstall options via your Start menu, Programs menu (Windows XP), or All Programs menu (Windows 7). Go to the DLCATA folder and select Uninstall. In Windows 8, from Start screen select Windows Explorer. In the Libraries window select Computer at left then choose C drive. Select DLCATA folder and select Uninstall.
The DuraLabel Driver Uninstall Wizard will appear. Click Next.
Click Uninstall. This will remove the Catalyst driver from your system.
Click Finish. The Catalyst driver has been removed from your system.
Installing Paper Tray 2
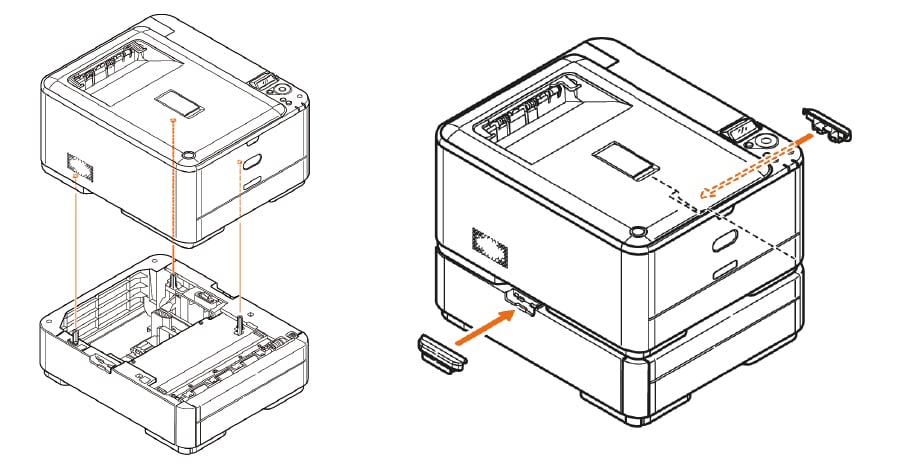
- Turn the printer off and disconnect the AC power cable.
- Place additional paper tray on desired location.
- Observing safety rules for lifting and, using locating guides, place printer on top of the additional paper tray.
- Fit retaining clips as shown.
- Re-connect the AC power cable and turn the printer ON.
Energy Saving Settings
POWER SAVE MODE
If you do not use the machine for a while, it will enter power save mode to control the power consumption of the device. To cancel or initiate power save mode, press the Power Save button on the control panel. The Power Save button illuminates while in Power Save Mode.
NOTE: By default, the time interval to enter power save mode is set to 30 minutes. You can change the time interval by pressing the Setting button on the control panel. Then select Sys Config Menu > Power Save Time.
SLEEP MODE
Your machine transitions from power save mode to sleep mode after a set period of time. In sleep mode the power consumption of the device is minimal. The Power Save button blinks while in sleep mode.
NOTE: The machine will not enter sleep mode if an error occurs, and the machine requires attention. By default, the time interval to enter sleep mode is set to 10 minutes. You can change the time interval by pressing the Setting button on the control panel. Then select Sys Config Menu > Sleep Time. It will automatically switch from Sleep Mode to Power Save Mode. In a network environment with a large number of packets flows, your computer may respond by automatically switching from Sleep mode to Power Save Mode. After a period of time has elapsed, the computer will automatically enter into Sleep Mode.
RETURNING TO STANDBY MODE
To return the machine to standby mode from power save or sleep mode, press the Power Save button on the control panel.
NOTE: When your machine receives a print job, it automatically returns to standby mode.
More Support Options
If you have any questions about using your DuraLabel Catalyst printer, get help from Graphic Products? world-class support team by calling 800-788-5572 or visiting GraphicProducts.com. We?re here to help with all your labeling needs!


