Overview of pipe marking systems used to identify contents and hazards.
Why Is Pipe Labeling Important for Facility Safety and Efficiency?
Pipe labeling is essential for facility safety because they help provide essential information where it's needed most to keep everyone safe. Clear, standardized markings help prevent injuries, reduce emergency response delays, support OSHA and ANSI/ASME compliance, and improve operational efficiency in industrial and commercial environments.
The sections below break down OSHA and ANSI/ASME pipe marking requirements, what information compliant labels must include, how pipe labeling improves safety and efficiency, and best practices for implementing a standardized system across a facility.
- OSHA pipe marking requirements and enforcement expectations
- ANSI/ASME A13.1 pipe labeling standards explained
- What information must appear on compliant pipe labels
- How pipe marking improves emergency response and hazard communication
- Color-coding and formatting requirements for different pipe contents
- Placement and visibility best practices
- Common pipe labeling mistakes that create compliance risk
- Resources to support facility-wide pipe marking programs
Unmarked or poorly marked pipes create confusion during routine work and emergencies alike. Understanding why pipe labeling matters is the first step toward building a safer, compliant facility.
Common Pipe Marking Standards
Visual introduction to industrial pipe marking concepts and layout.
The purpose of pipe marking is to communicate the contents of pipes and provide important details if specific hazards exist, like extreme temperatures or pressure.
Pipe labels are critical for maintenance teams and emergency responders, helping them quickly identify pipe contents and respond to issues safely and efficiently. The pipe marking standard organizations choose will depend on their facility type and location. Some industries and jurisdictions will have additional legal requirements.
Clear and standardized pipe marking labels support overall workplace efficiency. These pipework labels enable workers to make informed decisions and take precautions during routine operations and emergencies by providing essential information about the contents and potential hazards of the pipes.
Effective premade and custom pipe labels improve organizational communication and collaboration. Consistent pipe labeling practices allow for all personnel, including contractors and visitors, to easily understand and navigate the facility's piping system. This creates a culture of safety and teamwork, where everyone plays a role in maintaining a secure and productive work environment.
Compliance with pipe labeling standards demonstrates a commitment to regulatory compliance and best practices. Organizations not only meet legal requirements but also demonstrate their dedication to safety and professionalism by aligning with industry standards.
Implementing proper pipe marking is an investment in the well-being of employees, the efficiency of operations, and the reputation of the organization. Facilities can create a safer, more productive, and compliant workplace for everyone by prioritizing clear and consistent pipe labeling practices.
Here's an overview of the most common pipe labeling standards a variety of industrial facilities and industries use:
General Pipe Marking: ANSI/ASME A13.1
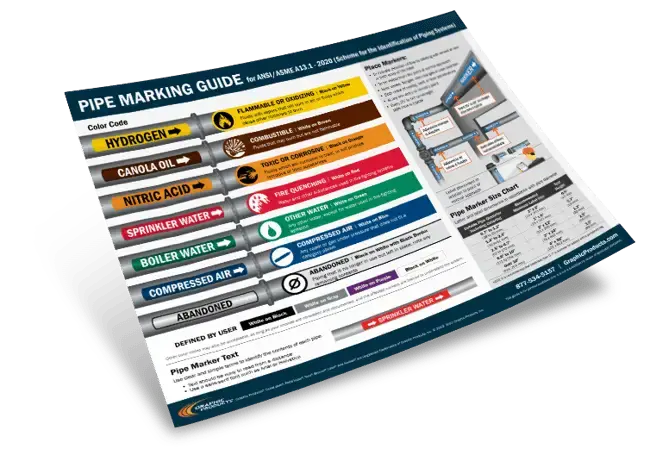
Standard pipe marker color codes for identifying contents and hazards.
The American National Standards Institute (ANSI) offers a general approach for labeling piping systems in industrial and power plants in their Scheme for the Identification of Piping Systems or ANSI/ASME A13.1. It's the broadest and most common pipe marking recommendation in the United States and is the foundation for most pipe labeling projects across multiple industries.
It also applies to commercial and institutional facilities including buildings used for public assembly. However, it does not apply to buried pipelines or electrical conduits due to the different factors and regulations managing these systems.
If a facility operates in the United Kingdom, Europe, Australia, and beyond, it will need to follow relevant standards:
- The United Kingdom pipe labeling guidelines are provided by organizations like the Health and Safety Executive (HSE) or the British Standards Institution (BSI).
- European countries implement pipe labeling standards outlined by the European Committee for Standardization (CEN) or the International Organization for Standardization (ISO) for marking and pipe identification labels.
- Australian standards and regulations for labeling are established by organizations such as Safe Work Australia or Standards Australia.
OSHA's View on Pipe Marking
OSHA does not have requirements for pipe labeling, although it's still a vital part of maintaining a safe workplace. Pipe labeling falls within the scope of OSHA's General Duty Clause, which covers all potential hazards in the workplace.
In standard 1910.261(a)(3)(ii), OSHA recommends following ANSI/ASME A13.1 for best practices and labeling all pipes with their contents to help with general facility maintenance and communication.
Facilities without pipe marking labels may be subject to a citation if the following apply:
- Pipes containing potentially hazardous contents
- Pipes are part of a hazard prevention or emergency response system
- Pipes needed to redirect the flow, shut off, or adjust for maintenance or other necessary work
- The pipe or its contents affect procedures during an emergency
Confusion over pipe contents in these instances can result in injury and even death, which makes pipe labeling crucial.
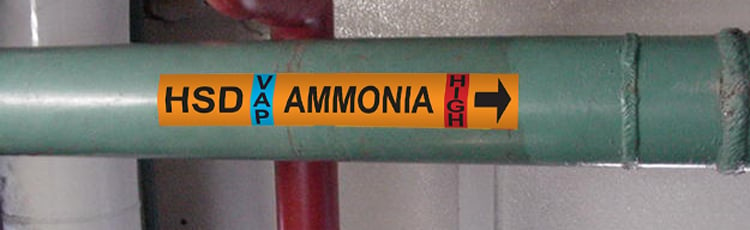
Ammonia Pipe Marking: IIAR Bulletin 114
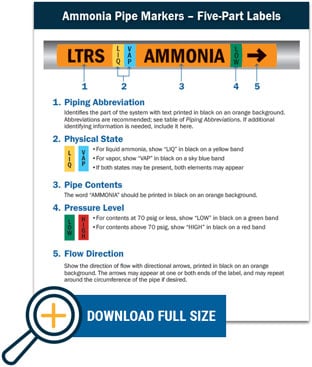
Five-part labeling system showing contents, abbreviations, and pressure.
Facilities with ammonia refrigeration systems need to use ammonia pipe labels to improve the visibility of the system's parts to help reduce the chances of toxic ammonia exposure.
The International Institute of All-Natural Refrigeration (IIAR), formerly known as the International Institute of Ammonia Refrigeration, provides guidelines for labeling ammonia piping and components in their Identification of Ammonia Refrigeration Piping and Systems Components standard, or IIAR Bulletin 114. It breaks down the color scheme, label format, sizing recommendations, and abbreviations for pipe markers.
These guideline components need to meet certain requirements to ensure ammonia pipe labels properly convey the pipe’s contents:
- Color scheme: The labeling of ammonia piping typically includes specific colors for different types of pipe contents set forth by the IIAR. For example, yellow is often used to indicate ammonia pipes, while other colors may be assigned for specific purposes like the direction of flow or warning of potential hazards.
- Format: These are the details that should be mentioned and how it is laid out on the ammonia pipe labels. The information required on each pipe marking label includes the name of the pipe contents, the direction of flow, and any relevant safety information. The format may include standardized templates or layouts to ensure consistency across pipe labeling efforts.
- Sizing: These recommendations outline the right dimensions for pipe labels based on factors such as the pipe diameter and the distance to ensure the label can be easily read.
- Abbreviations: Pipe markers may include commonly understood symbols or industry-specific abbreviations for pipe contents, system components, or safety messages.
These ammonia pipe labels and its requirements align with ANSI/ASME A13.1 for consistency and serve as the preferred style to identify pipes that carry toxic contents like ammonia.
A facility audit should be performed to assess the piping system and workplace challenges before conducting any pipe marking. Once the pipe labeling standard is determined, it's time to understand the elements to include on the label.
The Components of a Pipe Marking Label
Five elements make an effective pipe label, according to ANSI best practices. Luckily, most pipe labeling standards use these same elements.
1. Text
Identify the pipe's contents by name, including any hazardous chemicals or substances present. Consider listing specific details of the contents if they have risks or require special handling. Safety information, such as handling instructions or emergency procedures, should be displayed on the pipe identification labels to guide workers in case of an accident.
Include contact information for responsible personnel or departments for quick communication in case of emergencies. Lastly, note the installation date or last inspection to confirm the integrity of the pipe system.
2. Size
Choose pipe labels and text that are large enough to be easily seen and understood. ANSI A13.1 outlines minimum label and text sizes based on a pipe's outer diameter. Here's a chart with minimum size suggestions for pipe labeling:

| 0.75 x 1.25 inches | 1 x 8 inches | 0.5 inches |
| 1.25 x 2.0 inches | 1 x 8 inches | 0.75 inches |
| 2 x 7 inches | 2 x 12 inches | 1.25 inches |
| 7 x 10 inches | 3 x 24 inches | 2.5 inches |
| Over 10 inches | 4 x 32 inches | 3.5 inches |
For a pipe diameter less than 0.75 inches, we recommend using permanent valve tags to identify them for the best visibility.
3. Direction of Flow
When applying pipe marking labels, it's important to show which way the substance inside is moving. Use arrows to point the direction of flow. If the contents can go both ways, put in more than one arrow. Make sure to mark where the pipe starts and ends, especially if it's part of a big system or has a lot of entry and exit points. Different-sized arrows or colors to show if the flow rate or pressure changes along the pipe can be used.
Sometimes, extra symbols may be needed on the pipe labels to show things like turbulence or when the flow stops and starts. Colors, following a pipe marker color code, can also be used to show when different fluids are flowing or if the flow changes direction at different points. Remember to include any special warnings about things like backflow or when flow needs to be controlled. These details help everyone understand how the pipes work and keep things running smoothly.
4. Label Placement
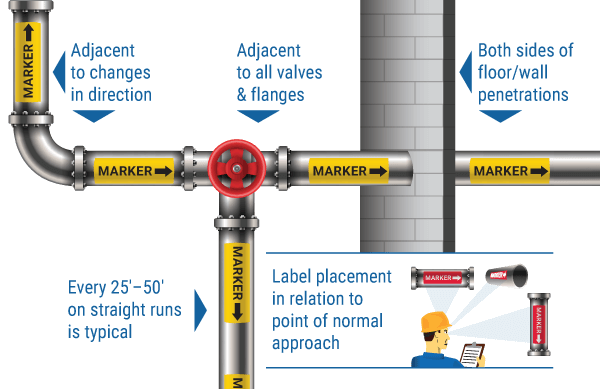
Recommended label placement for visibility along runs, valves, and wall penetrations.
Always consider how someone will approach and view a pipe. Premade and custom pipe labels must be visible from a person's point of normal approach. For example, if a pipe is directly overhead, apply the label below the center line. If the pipe is below eye level, apply the label above the center line for a clear view.
Best practices for the most effective label placement include:
- Every 50 feet on straight runs of pipe (or every 25 feet if more visibility is necessary)
- On both sides of floor, wall, or ceiling penetrations
- Next to all valves and flanges
- Where pipes change direction
Consistent pipe label placement is key to ensuring that pipe marking labels are easily recognizable and reliably interpreted throughout the facility. Facilities can enhance safety and streamline operations by continually following these best practices while guiding workers along the way.
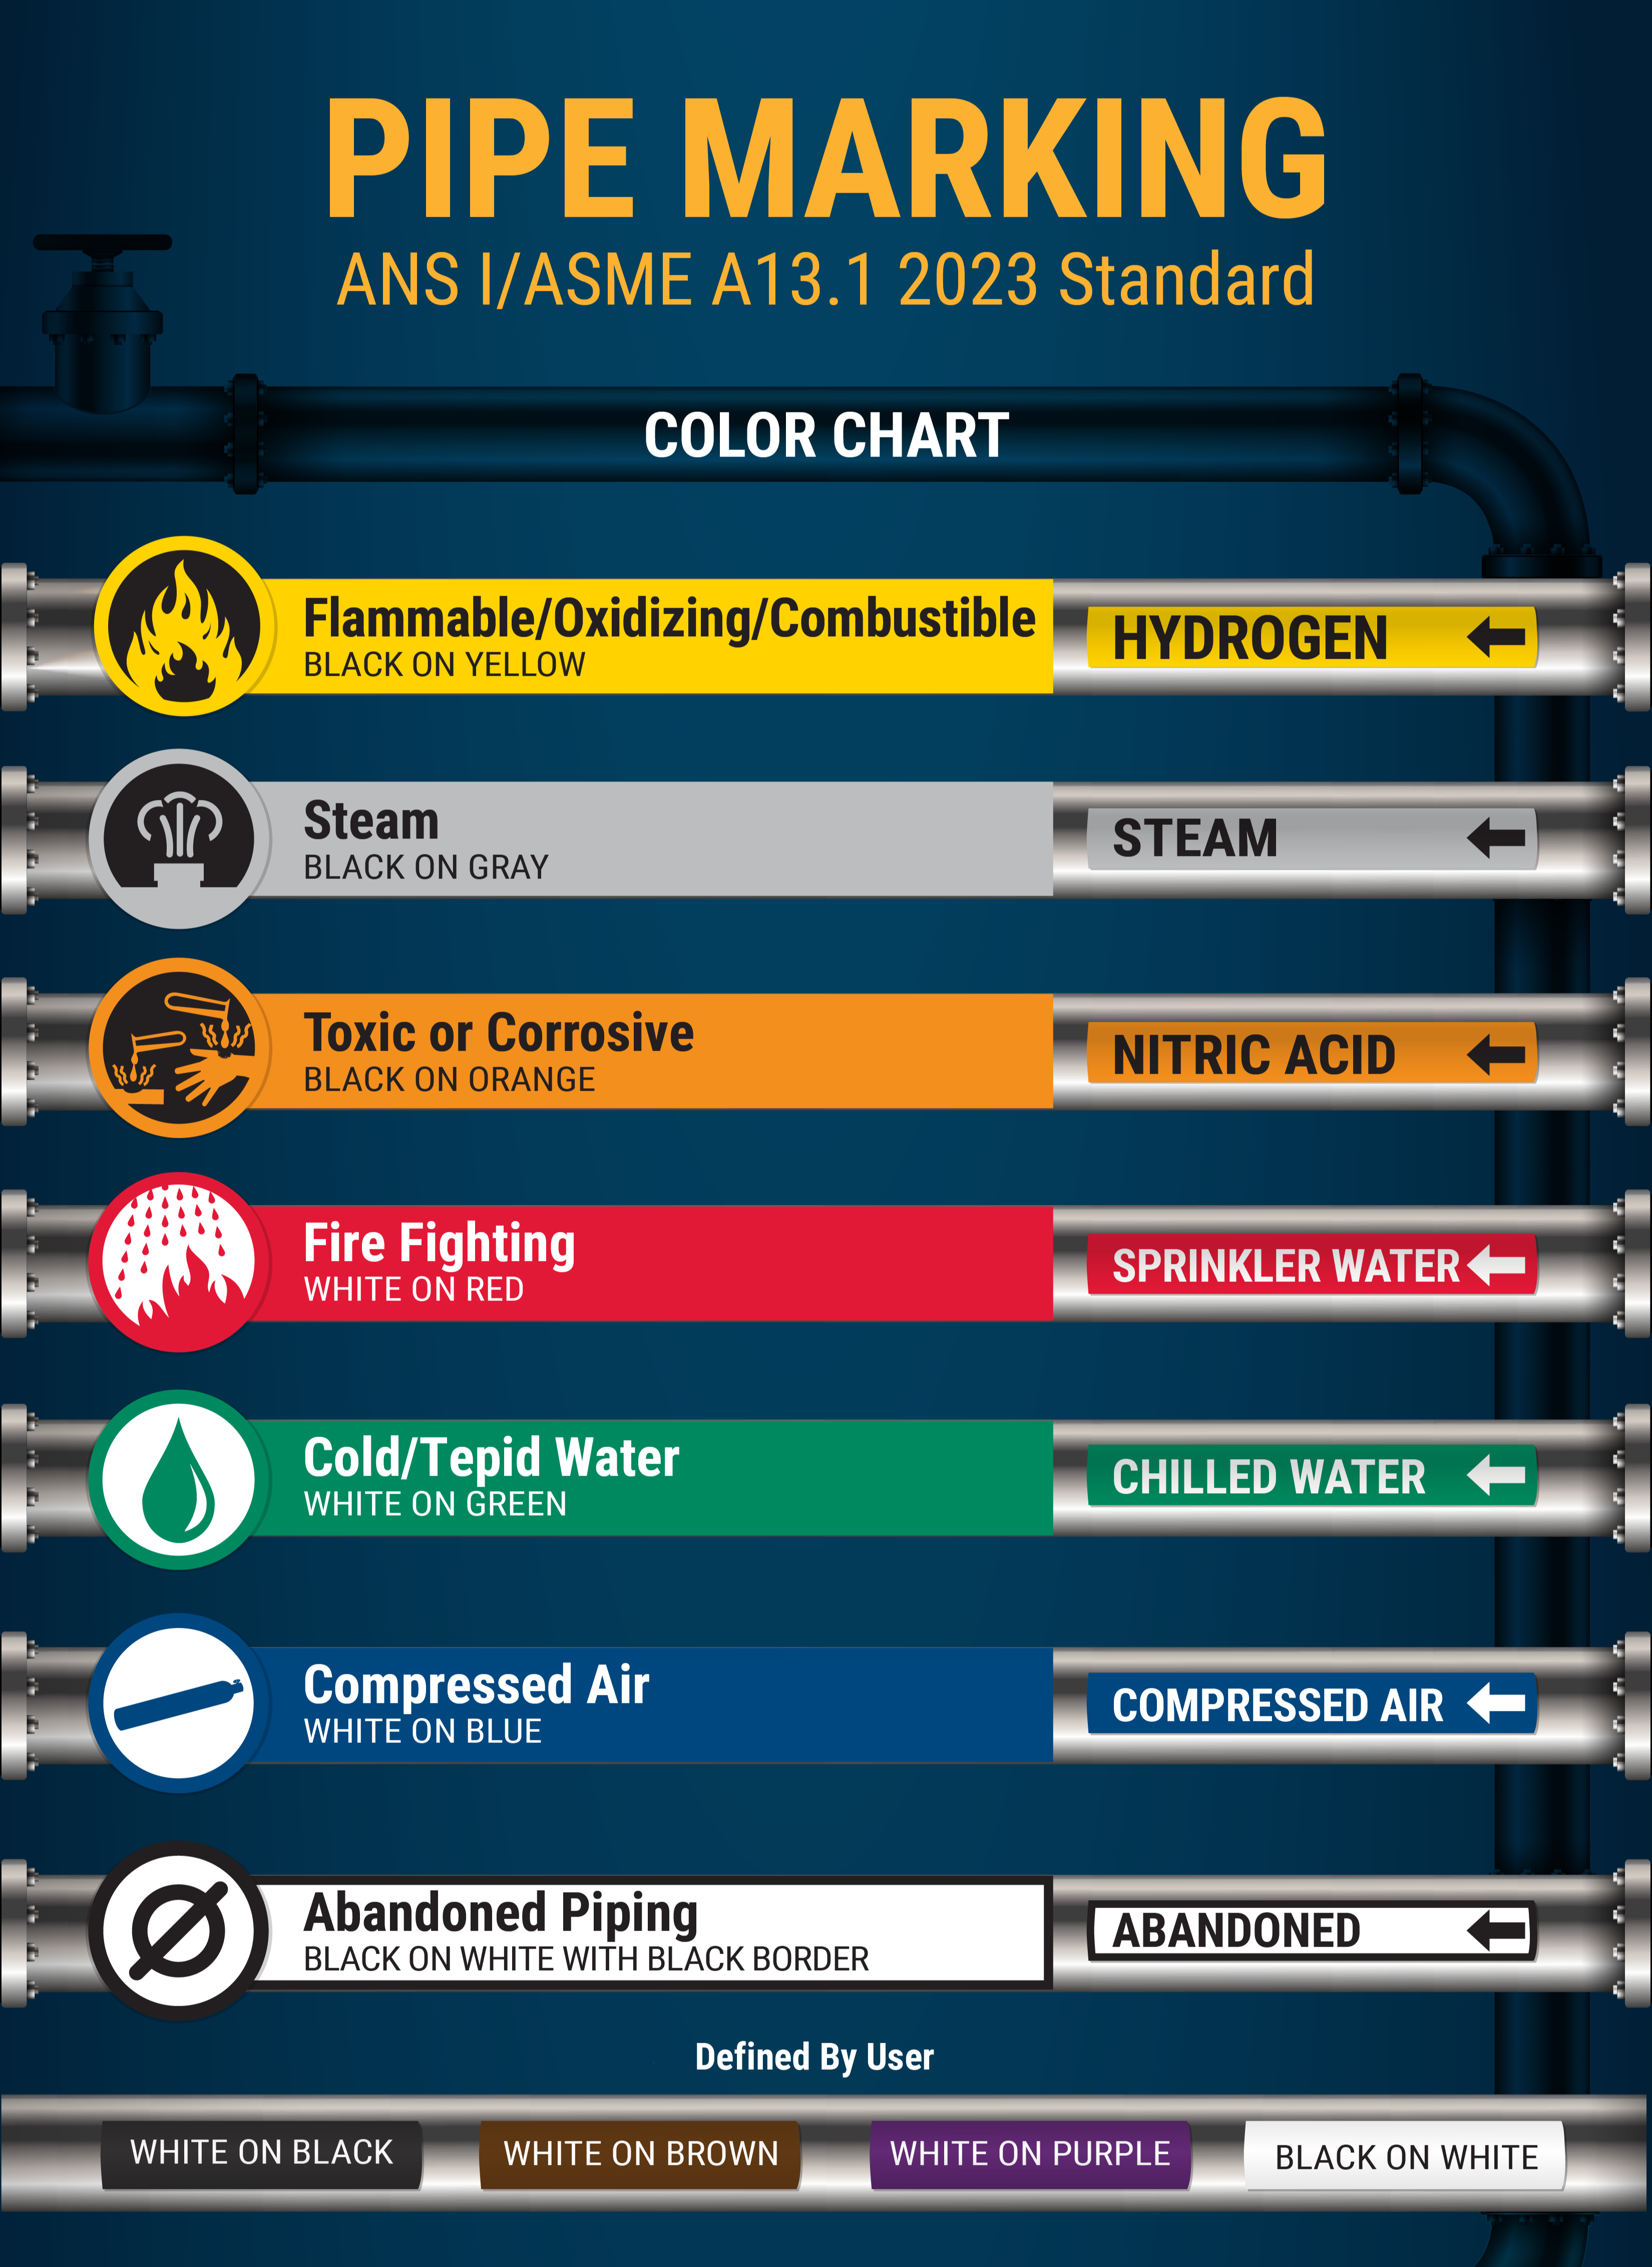
5. Pipe Marker Color Code
ANSI/ASME A13.1 recommends implementing a pipe marker color code. A color code helps improve the recognition of pipes while helping quickly alert people to the type of hazard potentially posed by a pipe's contents.
ANSI Z535.1 safety color standards guide the selection of color combinations to ensure visibility and recognition for all workers, including those with color-vision deficiencies. The system defines six primary color codes for common pipe contents, along with an additional designation for abandoned piping. Facilities may also adopt user-defined color combinations, provided they are used consistently and employees are trained to understand them.
| Pipe Contents | Standard Color Code | Description |
|---|---|---|
| Flammable / Oxidizing / Combustible | Yellow with black text | Materials that can ignite, support combustion, or burn under certain conditions |
| Fire Quenching Fluids | Red with white text | Fire suppression systems (e.g., sprinklers, CO₂, foam) |
| Toxic / Corrosive Fluids | Orange with black text | Substances that are hazardous to health or corrosive |
| Steam | Gray with black text | Steam, condensate, boiler feed water, or hot water |
| Other Water (Cooling, Potable, etc.) | Green with white text | Water systems not used for fire protection |
| Compressed Gases | Blue with white text | Gases under pressure |
| Abandoned Piping | White with black text and border | Pipes no longer in service but still in place |
One way organizations can easily reference ANSI pipe labeling requirements is with a detailed pipe marking chart. This ensures quick compliance for properly color-coded pipes.
What to Do Before Getting Started with Pipe Marking
It's a good idea for organizations to check with local authorities to make sure they are fully complying with the law before they mark their pipes. There are a few important factors to consider that could significantly affect the success of a pipe marking system, including:
-
Size of the piping system: Does the warehouse have a small or large piping system? Does it have multiple systems? This will help determine the most efficient pipe labeling method to carry out a marking system.
-
Condition of pipes: Warehouses must evaluate the physical condition of the pipes. Are the surfaces of pipes dirty, greasy, or rusty? Organizations can apply premade and custom pipe labels to hard-to-label pipe surfaces like those with durable valve tags and pipe grabber sleeves that provide a clean surface.
-
Contents of pipes: Does the warehouse have hazardous materials or extremely hot or cold contents running through its pipes? This will likely require certain supplies that can hold strong under high heat and harsh exposures to ensure the pipe labels remain intact and legible.
-
Workplace environment: Organizations must evaluate their facility for general hazards. Are there obstacles during day-to-day operations that could affect the condition or visibility of the labels? They need to consider things like potential exposure to weather, abrasion, and general wear and tear.
Evaluating a facility’s piping system before implementing pipe marking can help prevent potential hazards and accidents down the line.
Pipe Marking Solutions from DuraLabel®
To learn how to implement a pipe labeling system, readers can explore DuraLabel’s in-depth article on getting started with pipe marking. A free Pipe Marking Quick Start Guide is also available, offering detailed instructions and tools to help create an effective system.
Throughout the process, selecting the right supplies is essential to ensuring long-term success. High-quality solutions designed to withstand harsh environments help maintain durable, long-lasting premade and custom pipe labels.
For creating pipe labels and other visual communication tools, DuraLabel Industrial Sign and Label Systems provide reliable options. These products are engineered for durability and support a wide range of industrial identification needs, including pipe marking applications.
For a comprehensive overview, read DuraLabel’s How to Get Started with Pipe Marking article for step-by-step guidance on implementing a pipe marking system.
Read Next:
How to Meet IIAR Standards for Ammonia Pipe Marking
For safe operations and maintenance, its important employees know what's inside the pipes they're working ...
Read
How to Get Started with Pipe Marking and Labeling
Pipe marking quickly communicates information about a pipe and its contents, improving overall workplace ...
Read
Safety that Sticks: Using Pipe Labels for Every Size and Type of Pipe
Proper use of pipe labels in industrial settings is essential for safety, compliance, and operational ...
ReadTake Action

Print Your Own Signs
Free Label Design Software